这几天在装Apache httpd服务后,启动httpd服务,报错如下:

Starting httpd: httpd: Could not reliably determine the server's fully qualified domain name,using 0.0.0.0 for ServerName

(13)Permission denied: make_sock: could not bind to address [::]:88

(13)Permission denied: make_sock: could not bind to address 0.0.0.0:88 no listening sockets available, shutting down

Unable to open logs             [FAILED]

发现是SELinux在作怪,查看SElinux使用状态

getenforce

Enforcing
SElinux未禁用。
1、临时禁用SELinux:

# setenforce 0

这样重启服务器之后,还是会启动SELinux;
备注:setenforce 1 临时启用SELinux

2、永久禁用:
打开服务器上的SELinux配置文件,默认为:/etc/selinux/config(还有/etc/sysconfig/selinux),内容如下:

# This file controls the state of SELinux on the system.
# SELINUX= can take one of these three values:
#       enforcing - SELinux security policy is enforced.
#       permissive - SELinux prints warnings instead of enforcing.
#       disabled - SELinux is fully disabled.
SELINUX=enforcing
# SELINUXTYPE= type of policy in use. Possible values are:
#       targeted - Only targeted network daemons are protected.
#       strict - Full SELinux protection.
SELINUXTYPE=targeted

将上面的

SELINUX=enforcing 改为:SELINUX=disable  禁用SeLinux

然后启动httpd服务:

service httpd start
Starting httpd: httpd: Could not reliably determine the server's fully qualified domain name,using 0.0.0.0 for ServerName     [  OK  ]
使用tcpdump抓取HTTP包

tcpdump  -XvvennSs 0 -i eth0 tcp[20:2]=0x4745 or tcp[20:2]=0x4854

0x4745 为"GET"前两个字母"GE",0x4854 为"HTTP"前两个字母"HT"。

tcpdump 与wireshark
Wireshark(以前是ethereal)是Windows下非常简单易用的抓包工具。但在Linux下很难找到一个好用的图形化抓包工具。
还好有Tcpdump。我们可以用Tcpdump + Wireshark 的完美组合实现:在 Linux 里抓包,然后在Windows 里分析包。

tcpdump tcp -i eth1 -t -s 0 -c 100 and dst port ! 22 and src net 192.168.1.0/24 -w ./target.cap

(1)tcp: ip icmp arp rarp 和 tcp、udp、icmp这些选项等都要放到第一个参数的位置,用来过滤数据报的类型
(2)-i eth1 : 只抓经过接口eth1的包
(3)-t : 不显示时间戳
(4)-s 0 : 抓取数据包时默认抓取长度为68字节。加上-S 0 后可以抓到完整的数据包
(5)-c 100 : 只抓取100个数据包
(6)dst port ! 22 : 不抓取目标端口是22的数据包
(7)src net 192.168.1.0/24 : 数据包的源网络地址为192.168.1.0/24
(8)-w ./target.cap : 保存成cap文件,方便用ethereal(即wireshark)分析

常用


tcpdump -q -X -i eth0  port 80

情况1:
MySQL server has gone away错误最常见的原因是服务器超时了并且关闭了连接。缺省地,如果没有事情发生,服务器在 8个小时(28800秒)后关闭连接。你可在启动mysqld时通过设置wait_timeout变量改变时间限制。
情况2:
或者DB服务器重启,之前的连接已经失效

思路:
网上说错误码为2013或者2006的就用ping方法去验证是否断开,然后重连
其实应该还有一种情况就是DB服务器重启的时候之前连接已经失效,error会有等于null的情况,这种情况也需要重连

过程:
1.query
2.query返回false,如果不返回false表示执行成功,直接返回数据
3.判断错误码为2012或者2006或者为null的就去ping一下,然后重新连接

  1. 先下载这个https://github.com/libfuse/libfuse或者yum install fuse-libs

    下载地址:https://github.com/libfuse/libfuse/releases/download/fuse-2.9.7/fuse-2.9.7.tar.gz
    
./configure
make -j8
make install
  1. 先下载这个https://github.com/osxfuse/sshfs

    下载地址:https://github.com/osxfuse/sshfs/archive/osxfuse-sshfs-2.5.0.tar.gz
    
./configure
make
make install (as root)

3.继续

ldd `which sshfs`

4.挂载


sshfs sessy@mycomputer:/remote/path /local/path -C -p 9876 -o allow_other

wiki:https://wiki.archlinux.org/index.php/SSHFS

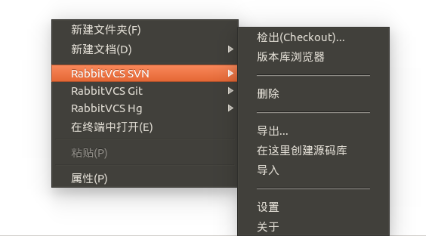
个人推荐这一款rabbitvcs wiki

Ubuntu安装步骤

sudo add-apt-repository ppa:rabbitvcs/ppa

sudo apt-get update

安装依赖库

sudo apt-get install python-nautilus python-configobj python-gtk2 python-glade2 python-svn python-dbus python-dulwich subversion meld

因为我的版本是14.04的

sudo apt-get install rabbitvcs-cli  rabbitvcs-core rabbitvcs-gedit rabbitvcs-nautilus3

安装完成之后,右键仍未出现任何RabbitVCS SVN相关信息,此时需要执行重启nautilus的命令:

nautilus -q  

2016-09-07 23:07:52屏幕截图.png